Gear & techniques
Why Underwater Photos Turn Blue—and What Actually Brings the Color Back
The reef looked colorful; your photograph looks blue, and the flash adds a snowstorm of white dots. Here is how distance, lighting, and color balance change the next frame.
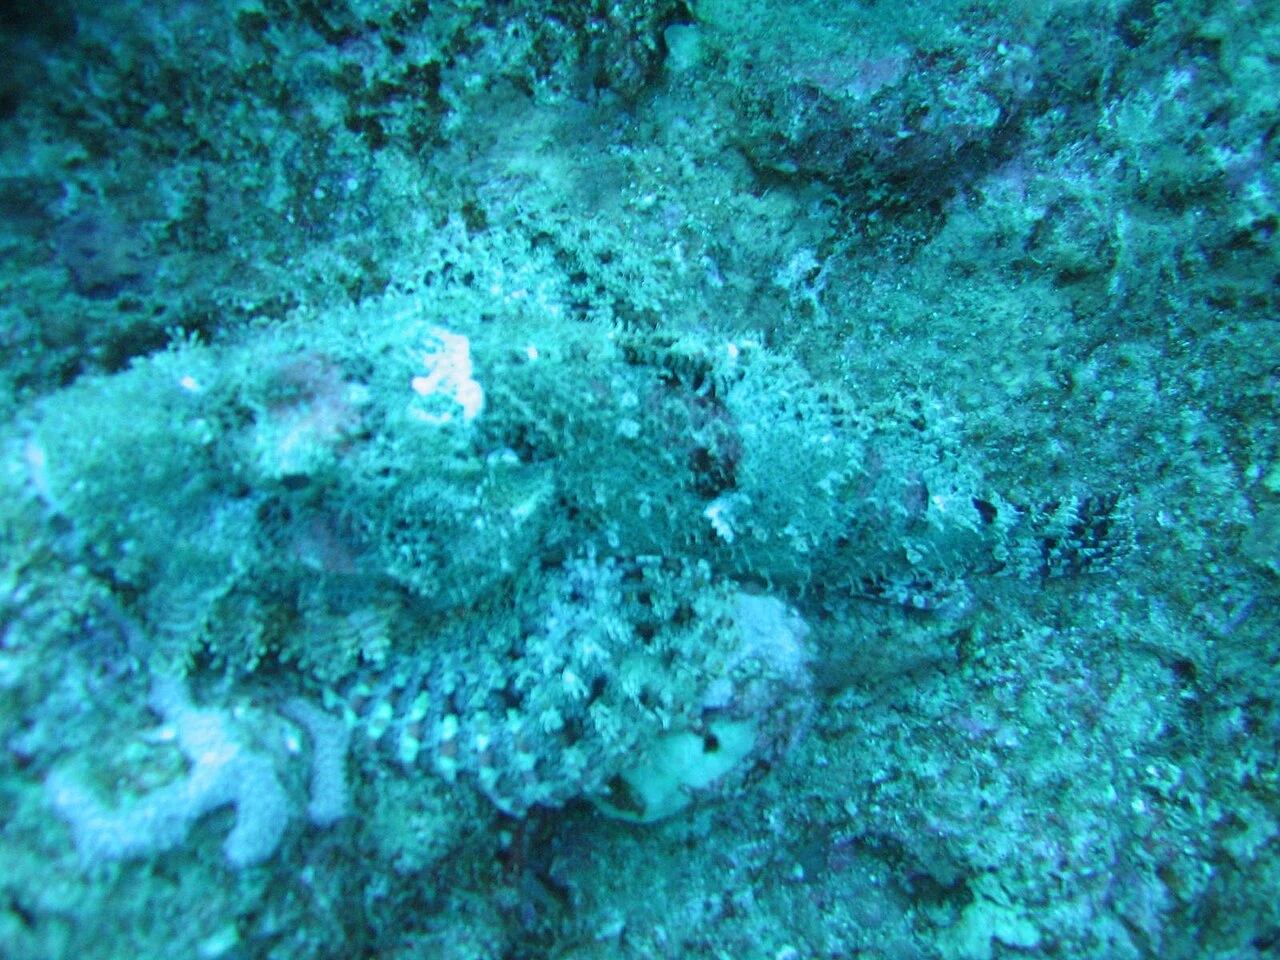
An ambient-light photograph from the Red Sea. Compare it with the flash photograph below: these are separate real exposures, not a simulated recoloring.
Photo: Serguei S. Dukachev. Image source · CC BY-SA 3.0. Resized and converted to WebP. No cropping, color changes, or content edits.
.jpg)
The reef looked colorful through your mask, but the photograph on your screen is washed in blue. On your next dive, watch a white light pass over a nearby subject: warm colors appear in the beam while the distant reef keeps its blue cast.
That small pool of light shows what a camera setting cannot supply on its own. A better sensor can make better use of weak light, but it cannot record red detail that never reaches it. To improve the next frame, separate three questions: what light reaches the subject, how much water lies between it and the lens, and whether your flash is lighting the subject or the particles in front of it. 1 2 3
Water edits the light before the camera sees it
Sunlight contains many wavelengths. Water absorbs them at different rates, with red light generally lost more rapidly than blue in clear ocean water. A red surface can therefore look dark when little red illumination reaches it. It has not changed pigment; the light available for it to reflect has changed. 1
The change is gradual. There is no single depth where red switches off, nor a universal percentage lost in the first fifteen feet. The result depends on the wavelength, the water, and the whole light path. Compare a clear reef with a green kelp forest at the same depth and the difference is plain. Use the actual scene to judge the problem rather than treating a rainbow-depth chart as a precise limit.
For a photograph made with sunlight, trace two legs: light travels down to the subject, then reflected light travels through more water to the camera. For a strobe-lit subject, trace the strobe-to-subject leg and the subject-to-camera leg. Moving the camera farther away adds water even when the depth gauge never changes. That is why a close reef detail can hold color while the wall behind it dissolves into blue. 2
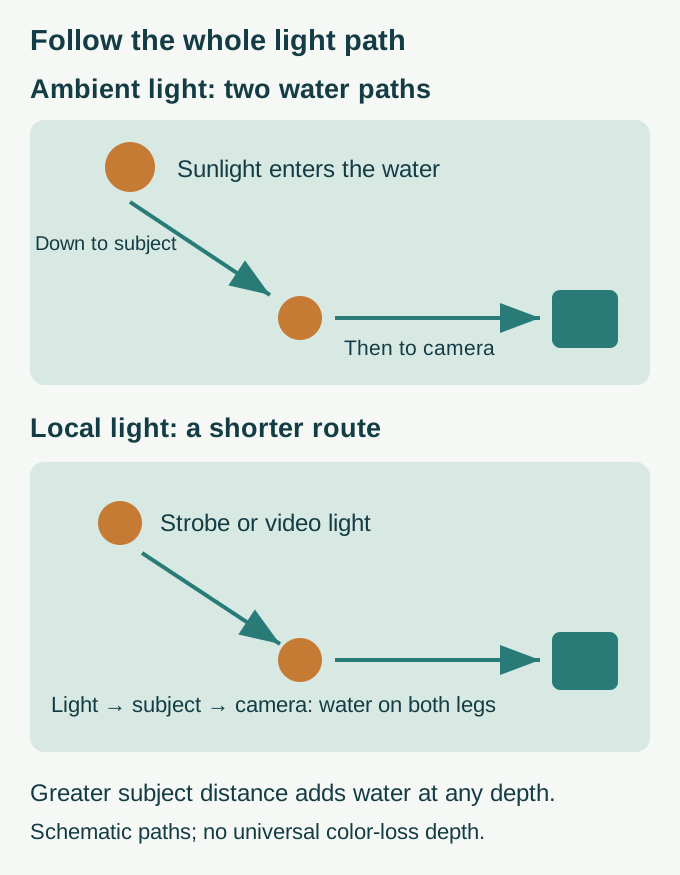
Follow both legs. A light beside the camera supplies a local source, but its light still travels through water to the subject and back. Distances are schematic, not measured attenuation limits.
Graphic: SeaLifeWiki. Research basis · Original SeaLifeWiki graphic. Original explanatory graphic; see caption for scope.
The first useful adjustment is often your position
Before reaching for the color controls, examine how much empty water sits between the lens and the subject. Can you choose a nearer composition without approaching wildlife or touching the bottom? A small scene within comfortable reach of your camera’s optics often works better than a distant scene enlarged with digital zoom.
Getting closer photographically does not mean pursuing a turtle or wedging a housing into coral. Let the animal pass naturally, choose a different subject, or accept a wider environmental portrait. If reaching the desired frame requires crowding wildlife, the frame is the wrong one for the encounter.
Try a stationary subject that can be framed from open water. Compare two compositions at different camera distances, keeping your depth and lighting as similar as practical. Back on the screen, look at contrast and the amount of haze, not just saturation. This separates a water-path problem from a color-setting problem. In poor visibility, reducing the water in the frame also reduces the volume containing particles that can scatter light. 3
White balance changes the interpretation of the light
White balance tells the camera how to render a neutral surface under the illumination it receives. Underwater, that can reduce an overall blue or green cast. A custom balance made for one view may need changing when depth, subject distance, or lighting changes. An action-camera underwater preset is likewise a starting point, not a promise that every scene will have accurate color. 2
If your camera supports RAW still photographs, that format gives you more flexibility to choose white balance afterward than a finished JPEG. It does not store an unfiltered version of the ocean. When a color channel contains very little useful signal, increasing its contribution can also expose noise. No slider can recover detailed color information that the capture never recorded.
Use a genuinely neutral reference when you can, under the same light as your subject. Do not assume a pale sponge or sandy patch is perfectly neutral. After adjusting, look at the entire frame: does the foreground look plausible while the water has become an unnatural purple? A single global correction may be trying to reconcile a locally lit subject with a much bluer ambient background. 2
A red filter spends light; it does not generate it
A color-correction filter changes the balance of light entering the lens by transmitting some wavelengths more readily than others. A red filter reduces the dominance of blue-green light; it cannot manufacture red light that never returned from the scene. Its usefulness depends on the light still available and the water you are shooting through. 4
That trade becomes visible in the camera settings. Less light entering the lens may require a longer exposure or higher sensitivity. If a previously sharp fish becomes blurred or the image becomes noisy, inspect those settings before deciding that the filter itself has improved the photograph because the thumbnail looks warmer.
Treat ambient-light filtering and nearby white artificial light as different setups. Start with the filter removed when your lamp or strobe supplies the foreground’s color, unless you are deliberately balancing a more advanced mixed-light arrangement. Make a short test clip or photograph and examine a neutral object in the beam. A strong red foreground is a useful sign that your correction no longer matches the illumination. 4
Artificial light supplies what a setting cannot
A suitable white strobe or video light sends a broader mixture of wavelengths toward a nearby subject. The short local path can preserve colors that sunlight lost on its much longer route. The effect has a reach: a beautifully lit foreground does not mean that the distant reef behind it will receive enough of the same light.
Strobes deliver a brief burst synchronized with a still photograph. Video lights illuminate continuously, allowing you to see their coverage while composing and to record moving footage. A continuous light can also make still photographs, but its output during a short exposure is not equivalent to the pulse from a powerful strobe. Backscatter’s controlled comparison illustrates how strongly the difference can depend on the particular equipment and exposure. 5
Choose around what your camera can actually do. Check whether the housing and camera support the triggering method an external strobe requires. For video, inspect beam coverage and how evenly the subject is illuminated. A narrow spot useful for finding a creature may leave a bright center and dark edges in a wide-angle clip. The relevant question is how the light covers your frame, not simply how impressive its power rating sounds.
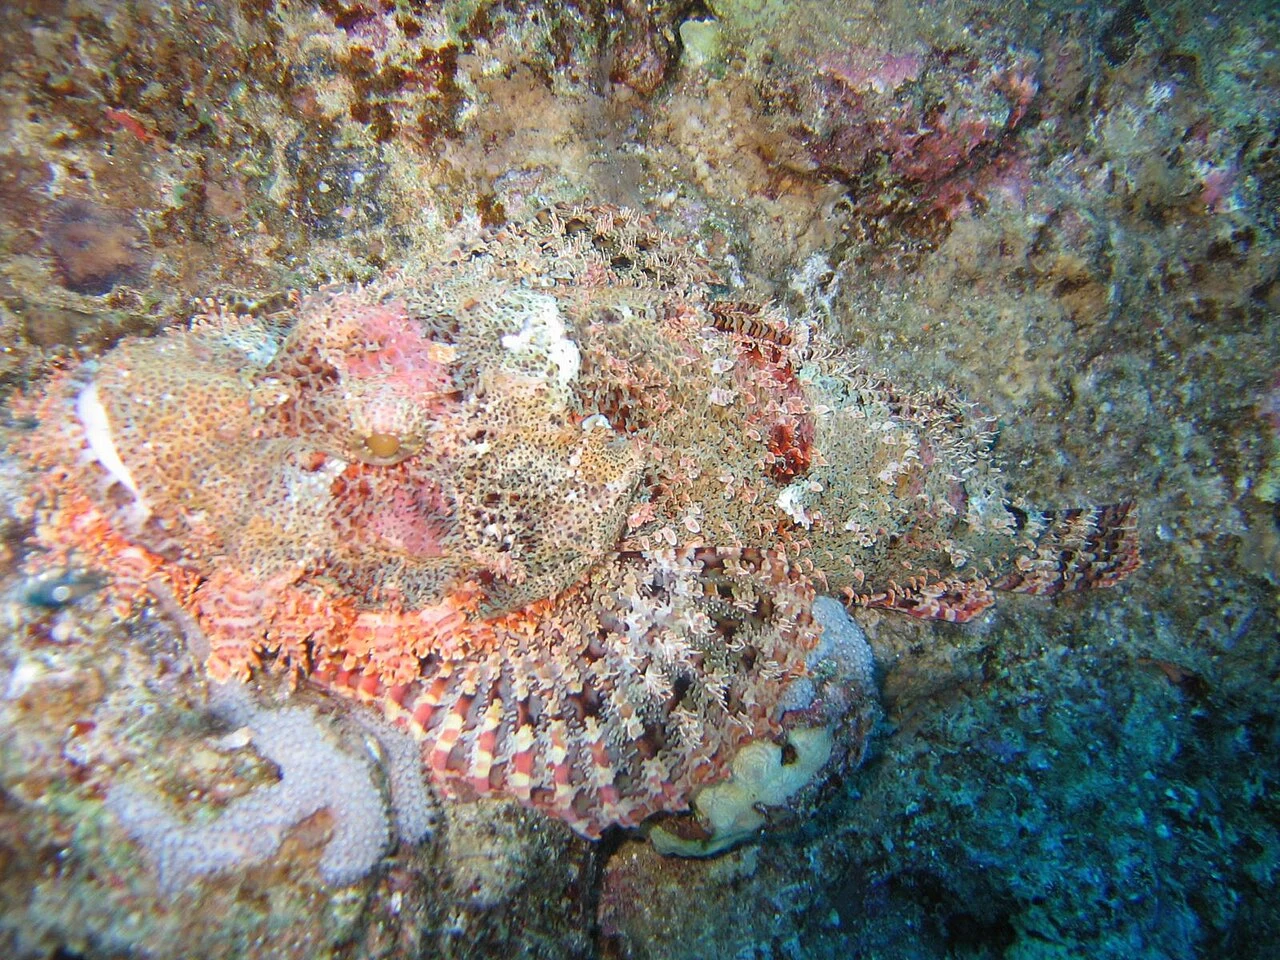
The corresponding flash exposure by the same photographer. Flash changes local illumination; the pair is an illustration of that effect, not a controlled comparison of every camera setting.
Photo: Serguei S. Dukachev. Image source · CC BY-SA 3.0. Resized and converted to WebP. No cropping, color changes, or content edits.
.jpg)
When the flash reveals a snowstorm
Those bright spots are often particles between the camera and the subject, lit strongly enough to send light back into the lens. A lamp or flash close to the viewing axis can illuminate the very water you are looking through. More power can make the dots brighter without making the subject clearer. 3
With an external light, try changing its position and angle so that useful light reaches the subject while less illuminates the near-lens corridor. Often that means working with the edge of a beam rather than pointing its brightest center straight along the lens axis. Inspect the next frame: did the nearby dots diminish, and is the subject still evenly lit? The answer tells you more than copying an arm position from someone else’s rig. 3
Good lighting cannot remove particles from the water. If the visibility is poor, reduce the scale of your scene. A nearby detail may reward careful lighting while a broad reef vista continues to disappoint. Also look behind you before repositioning: a fin kick that raises silt can undo the improvement you were trying to make.
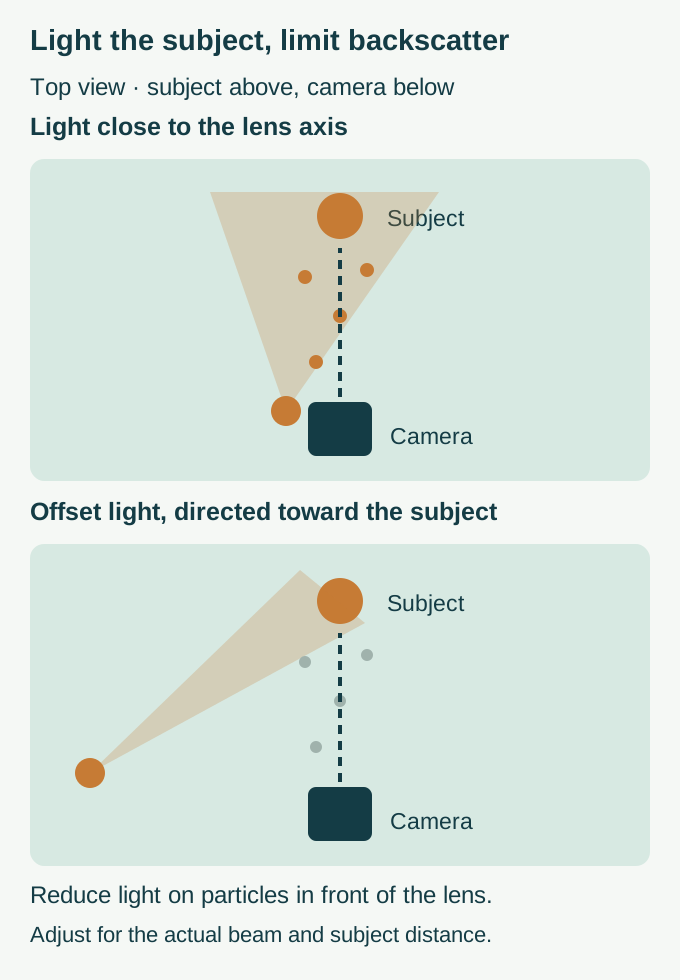
The aim is to light the subject while reducing illumination of particles immediately in front of the lens. This is a conceptual starting point; beam width, water, and subject distance determine the useful position.
Graphic: SeaLifeWiki. Research basis · Original SeaLifeWiki graphic. Original explanatory graphic; see caption for scope.
Give yourself one question to answer on the next dive
Choose one problem before entering the water: distant subjects that look washed out, an overall cast, uneven artificial light, or backscatter. Change one relevant variable at a time, and keep a few comparison frames. If you change distance, white balance, filter, and light power together, a better result still leaves you guessing about what helped.
For a wide scene in good ambient light, begin with composition and color balance. For a nearby subject whose warm colors vanish, examine the local light. For a frame full of white dots, investigate the water corridor and light angle. When the camera starts distracting you from buoyancy, your buddy, or the animal’s behavior, stop adjusting and rejoin the dive.
Try these observations while exploring the Monterey Bay map or preparing for the Florida Keys. And when you photograph a turtle for the identification guide, remember that shape and visible scales can matter more than an intensely saturated shell. A photograph succeeds when it shows what you meant to observe.
Sources & further reading
- NOAA Ocean Exploration — Light and color in the deep sea — Wavelength-dependent absorption and the changing underwater light field.
- Ikelite — Manual white balance for underwater still photography — Depth, distance, white-balance changes, RAW files, and mixed illumination.
- Ikelite — How to shoot underwater in low visibility and backscatter — Particle illumination, camera-to-subject distance, and light placement.
- DIVEVOLK — Underwater color correction filters: why and how — Manufacturer explanation of filter transmission and its limits; not an endorsement of a product.
- Backscatter — Strobes versus video lights for underwater photography — Flash and continuous-light behavior, with equipment-specific measurements.